Jenkins Pipeline Code Example to Upload File Into Aws
In the previous article, we have created the Continuous Integration (CI) pipeline for a unproblematic Java application. Information technology is now time to start working on the Continuous Deployment (CD) pipeline that volition take the Java application and deploy it to AWS. To build the CD pipeline, we volition extend the existing AWS Jenkins pipeline. If you take missed the previous commodity on edifice a CI pipeline for a Java application using Jenkins (link here), make certain you read that first earlier standing.
Quick introduction to AWS
Amazon Web Services or merely AWS is a cloud platform offer over 170 deject-based services available in data centers located worldwide. Such services include virtual servers, managed databases, file storage, automobile learning, and many others.
While AWS is the most popular cloud platform, many other providers, including Google Cloud, Microsoft Azure, or DigitalOcean share similar concepts and services to the ones presented here.
In instance you don't already have an AWS account, caput over to https://aws.amazon.com/ , and create one. You will accept 12-months costless-tier access, merely you notwithstanding need to enter your billing information and credit menu number merely in case you go over the free limits.
As a full general recommendation, stop any services in one case y'all don't use them anymore before costs first adding up.
Once yous take successfully signed up, you tin can open the AWS Management panel bachelor at https://console.aws.amazon.com/ . The console will give you an overview of all the services that AWS has to offer.
AWS Jenkins Pipeline to deploy a Coffee application
One of the easiest ways to deploy an awarding to the AWS infrastructure without getting into many technical aspects is using a service called Elastic Beanstalk (EB). From the console overview folio, locate the Rubberband Beanstalk service.
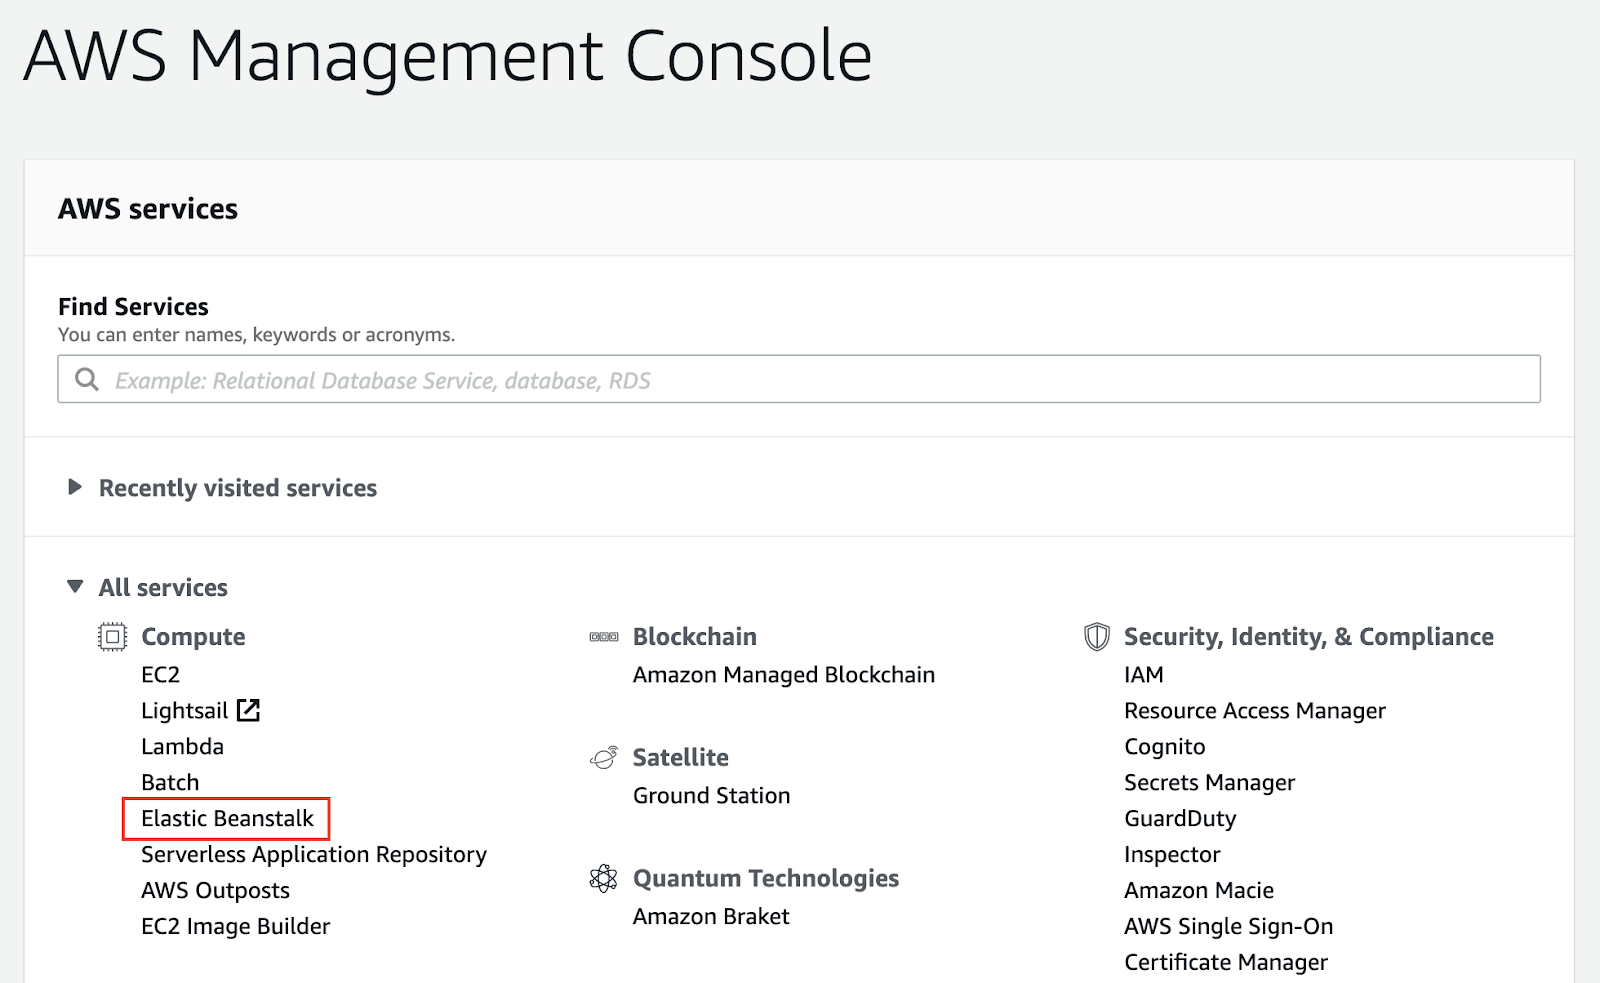
(01-aws-console.png)
The adjacent pace is to create a new application.
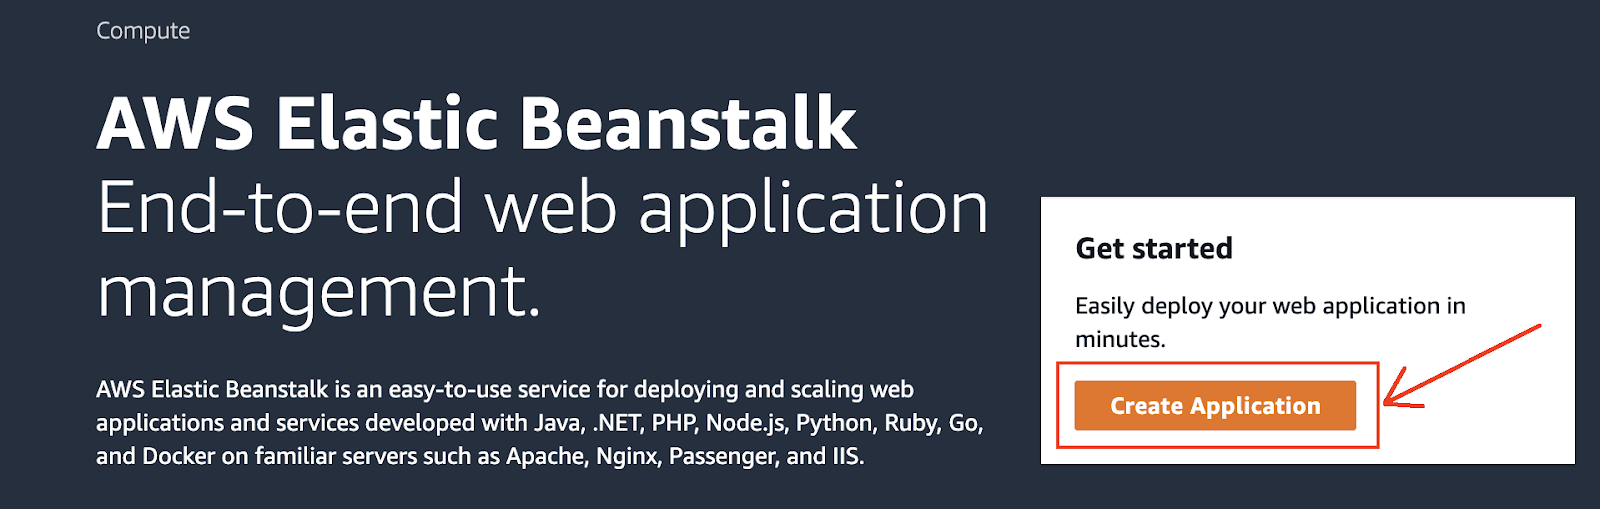
(02-eb-create-awarding.png)
I have named the application calculator, but you lot are free to phone call the application as you wish. Since nosotros are trying to deploy a Java application, we need to select the Java platform. Leave the rest of the platform fields to their default values.
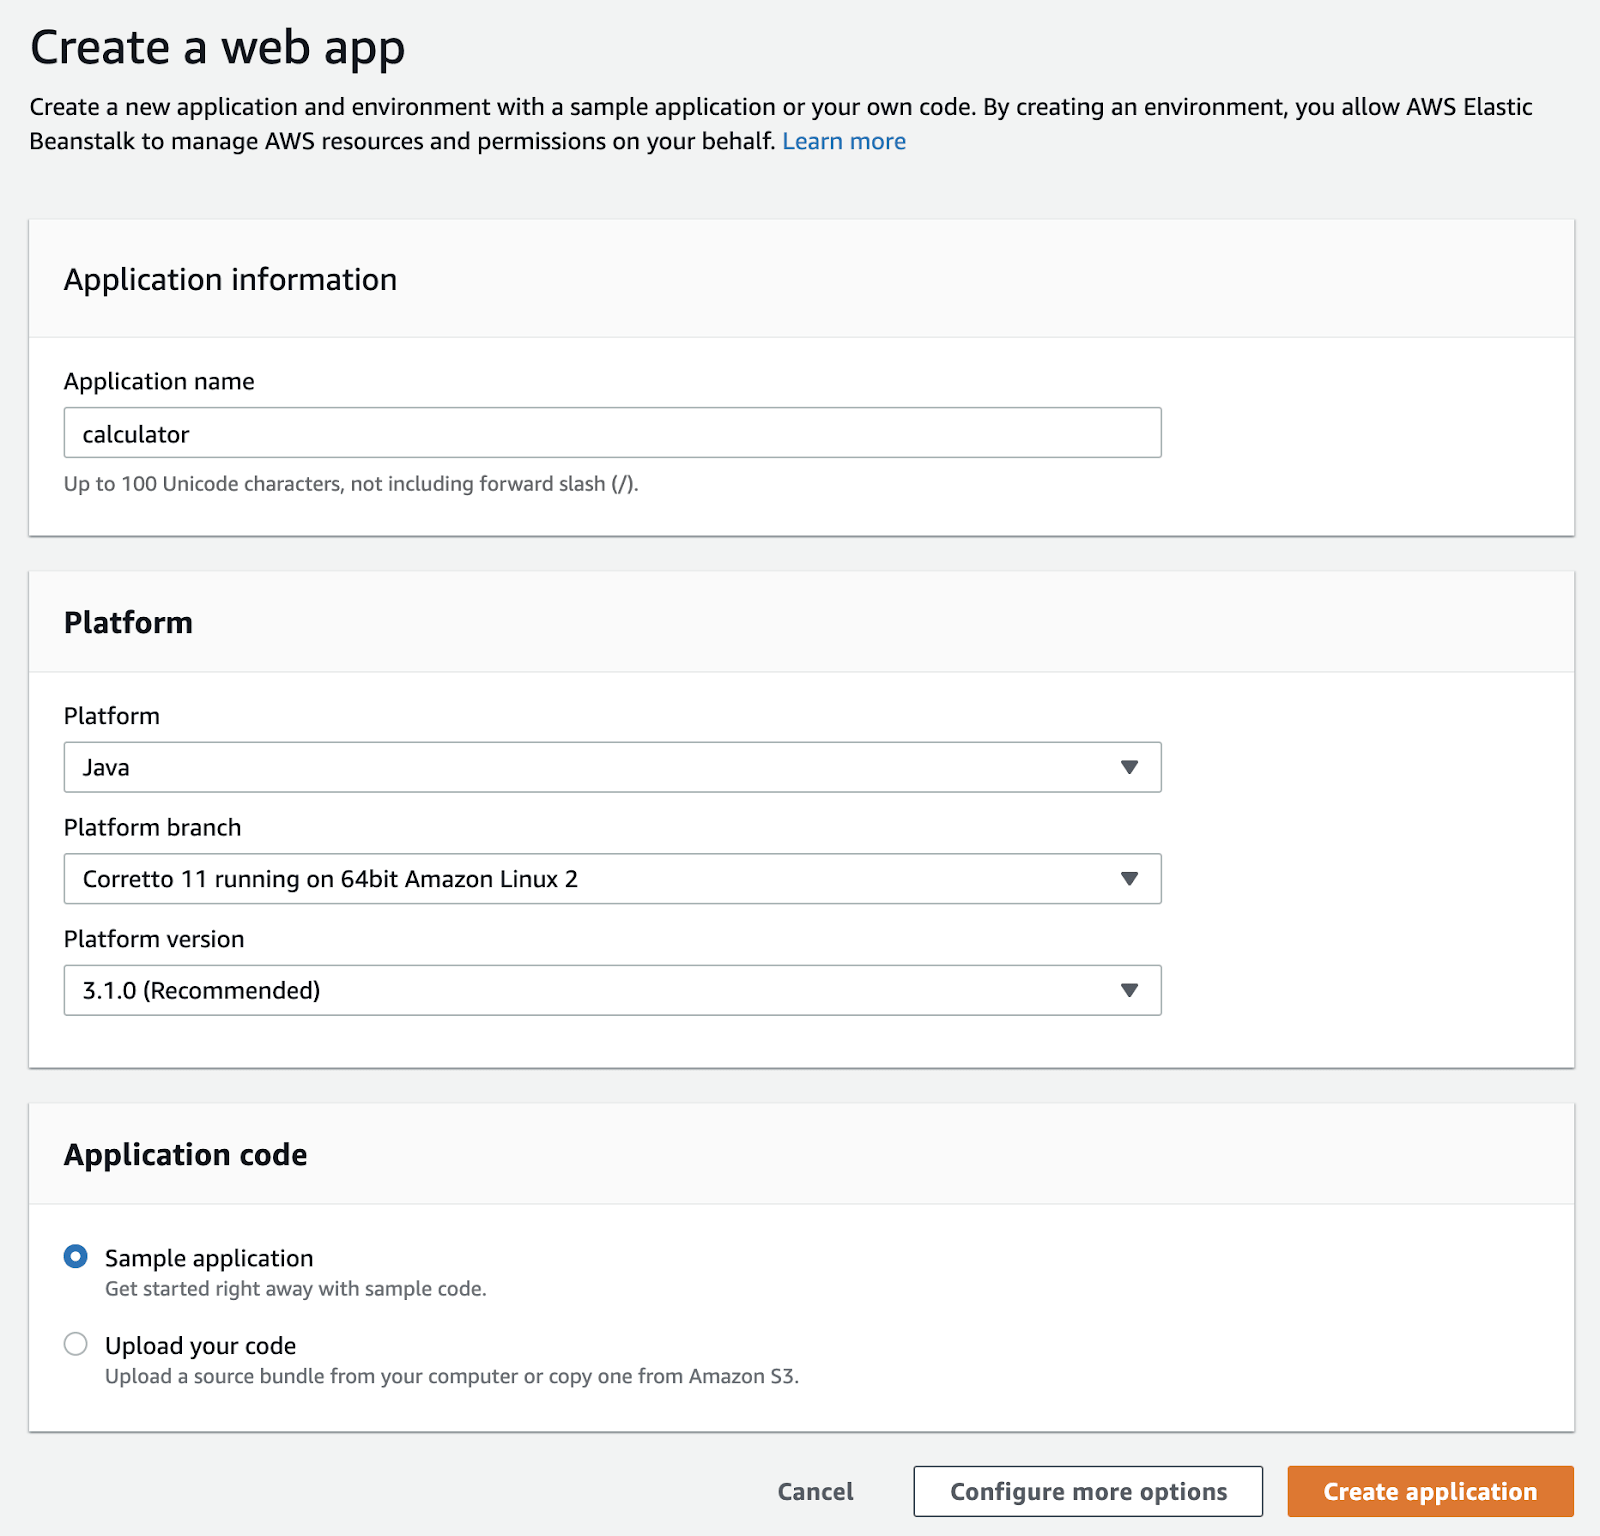
(03-eb-new-app-config.png)
You lot can first the application with a sample code awarding, just to see that it is running. Since we already take a packaged Coffee awarding in the form of a jar file, we can directly apply that.
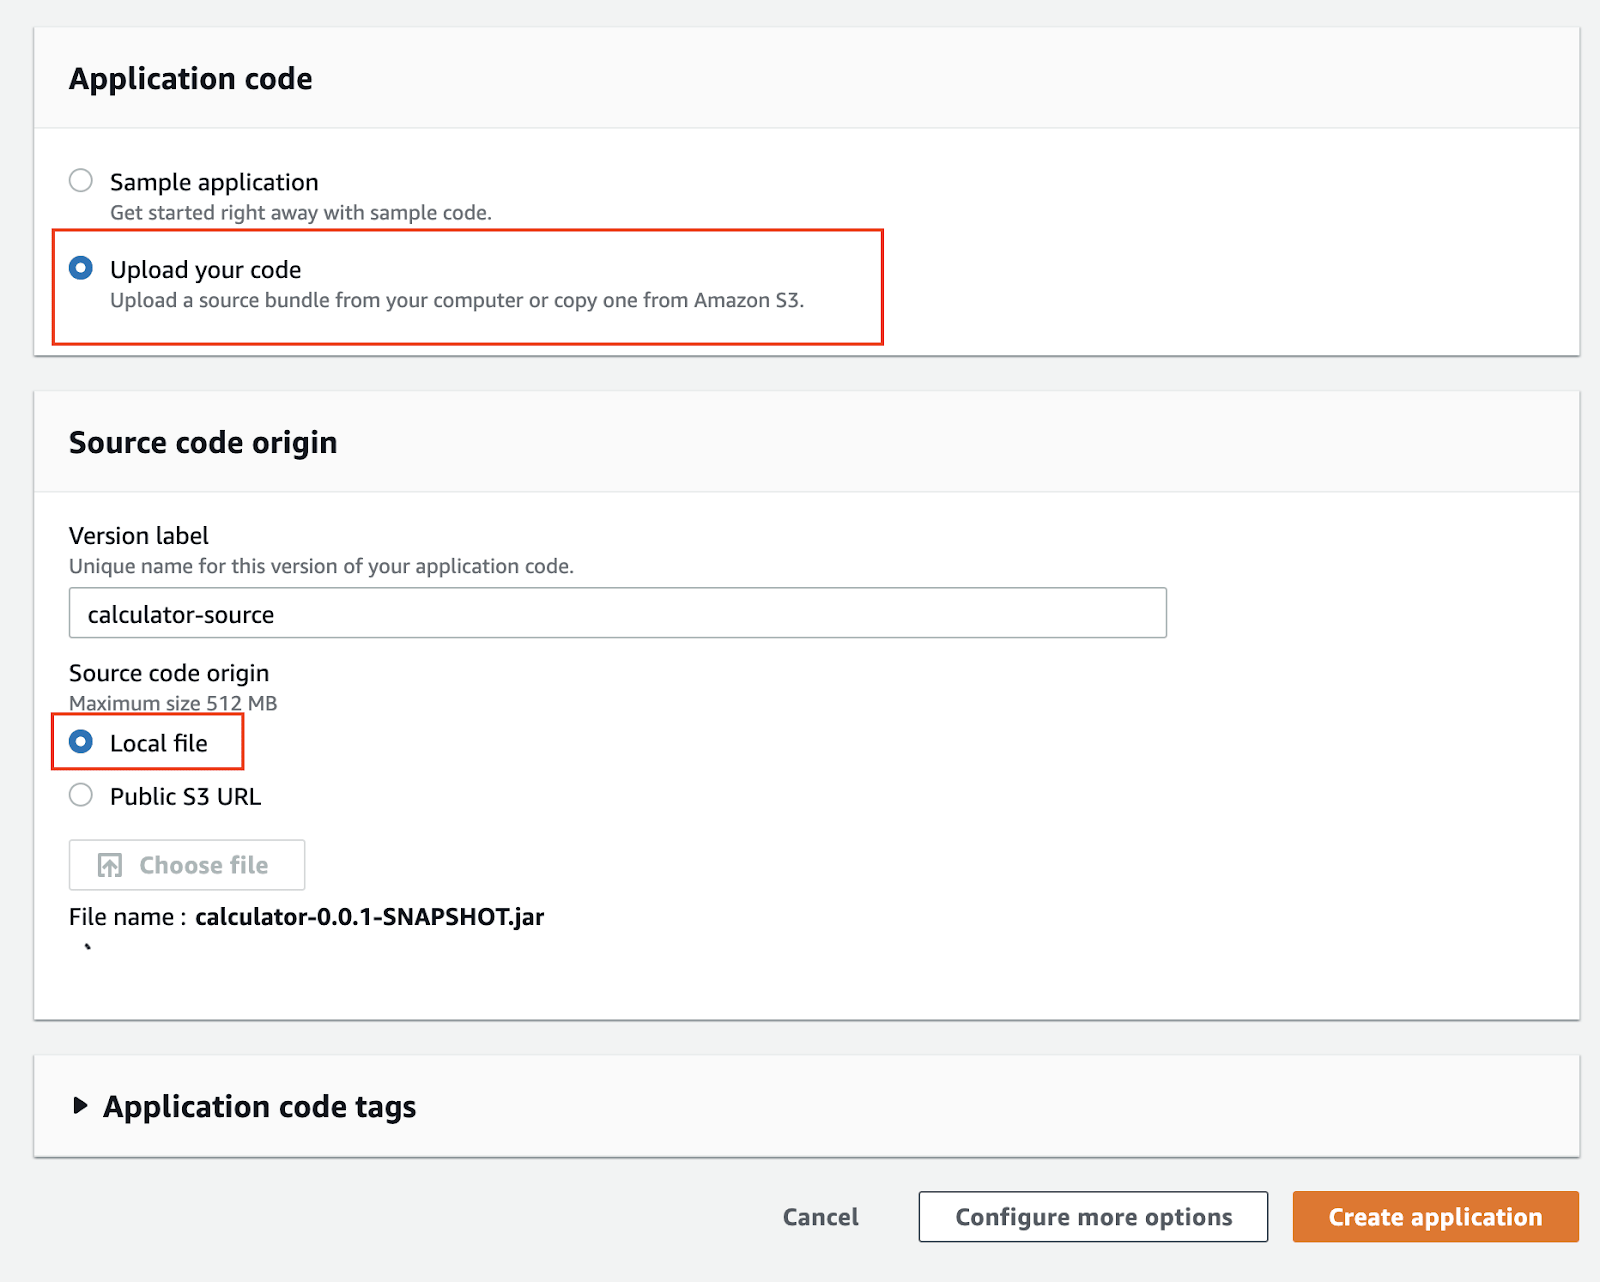
(04-eb-upload-code.png)
Wait for the file upload to complete. Finally, click on Create application . This may take a few minutes to get-go.
Now click on Environments , select the just environment being displayed, and right on top, you should encounter the public URL nether which the application is bachelor.

(05-eb-environments.png)
If you click on the link displayed, yous will become a 404 Not found status lawmaking, and that is expected. If you get a unlike status lawmaking, delight check the Troubleshooting section within this article. Add together /add?a=1&b=two to the address, and you lot should see the response.

(06-eb-app.png)
Congratulations! Y'all have merely deployed a Java application to AWS with only a few clicks.
How to deploy to AWS from Jenkins
So far, the process has been manual, just it has ensured that our application works on the AWS infrastructure. Since we want to automate this process, nosotros need to utilise the last to practice the steps that we did manually.
Fortunately, AWS provides the tools needed to automate this process. The main tool that will allow us to interact with AWS is the AWS CLI, a software tool that has no graphical interface.
The deploy the Java awarding to AWS from Jenkins, in that location are a series of steps we need to follow:
- Upload the jar archive to AWS S3 (S3 is like Dropbox for the cloud and the main entry signal to the AWS infrastructure when dealing with files).
- Create a new version of the application within EB by providing the jar achieve, which is now inside S3.
- Update the EB environs with the latest application version.
Yous can easily download and install AWS from https://aws.amazon.com/cli/ . You will notice installers for Windows, macOS, and Linux.
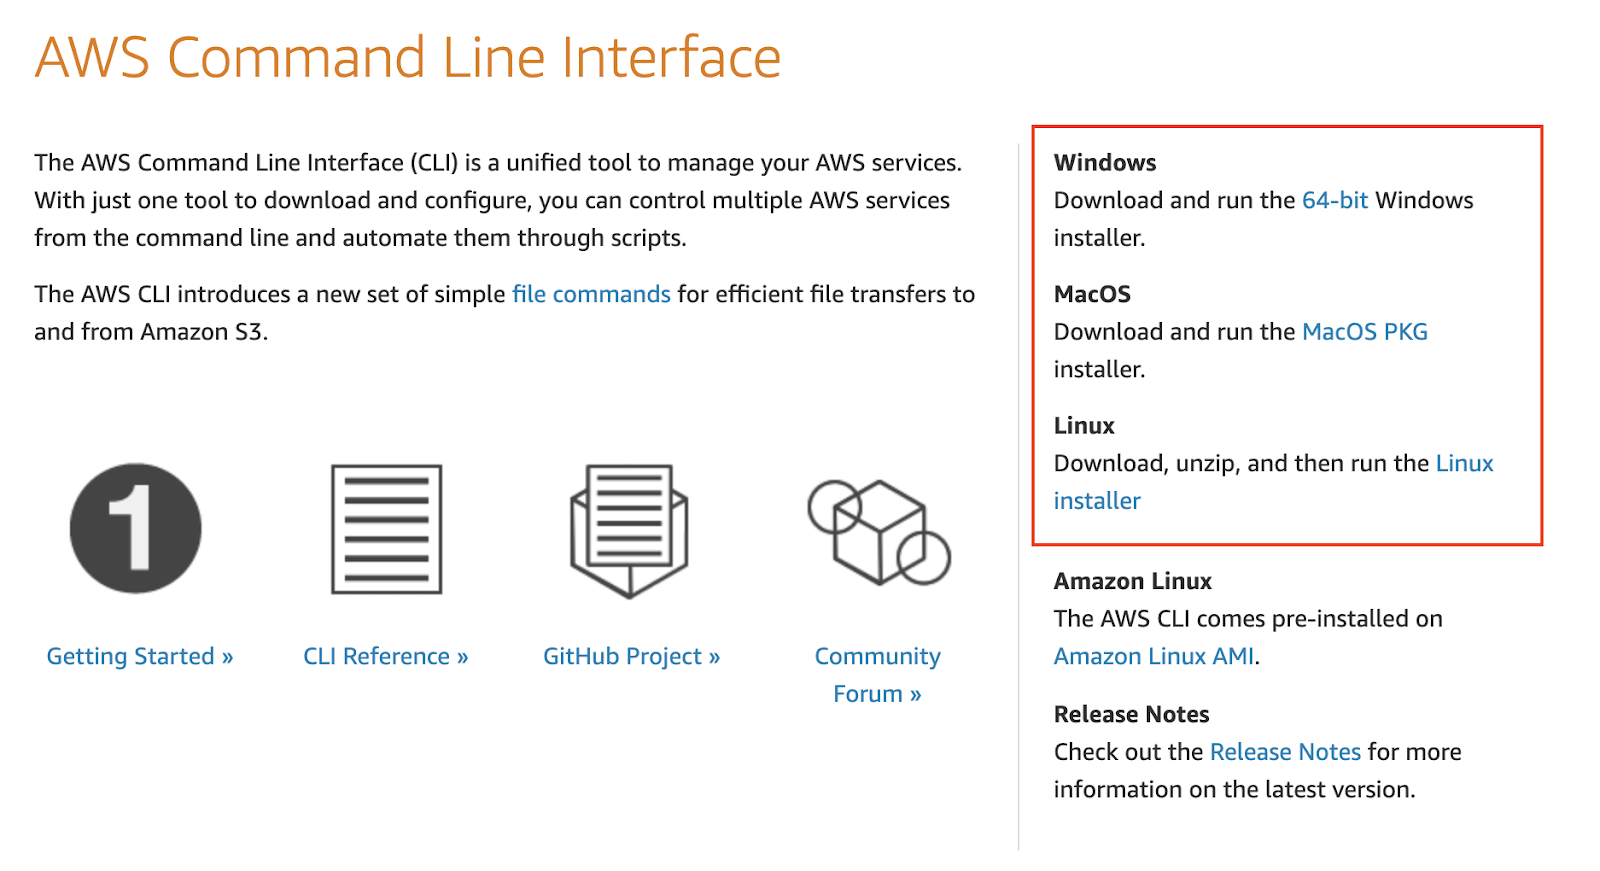
(07-aws-cli.png)
After the installation has completed successfully, open any terminal window and run the command aws –version. This will confirm that the installation has been successful and will display the AWS CLI version.

(08-aws-cli-locally.png)
If you have Jenkins installed on macOS, to get AWS CLI to work in Jenkins, yous may need to create or adapt the PATH variable with the value: /usr/local/bin:$PATH
How to upload a file to AWS S3 from Jenkins
S3 stands for Elementary Storage Service and is the gateway to the AWS infrastructure when working with files. You can see information technology like Dropbox but for the AWS infrastructure. Allow'southward go dorsum to the AWS Management Console and select the S3 service.
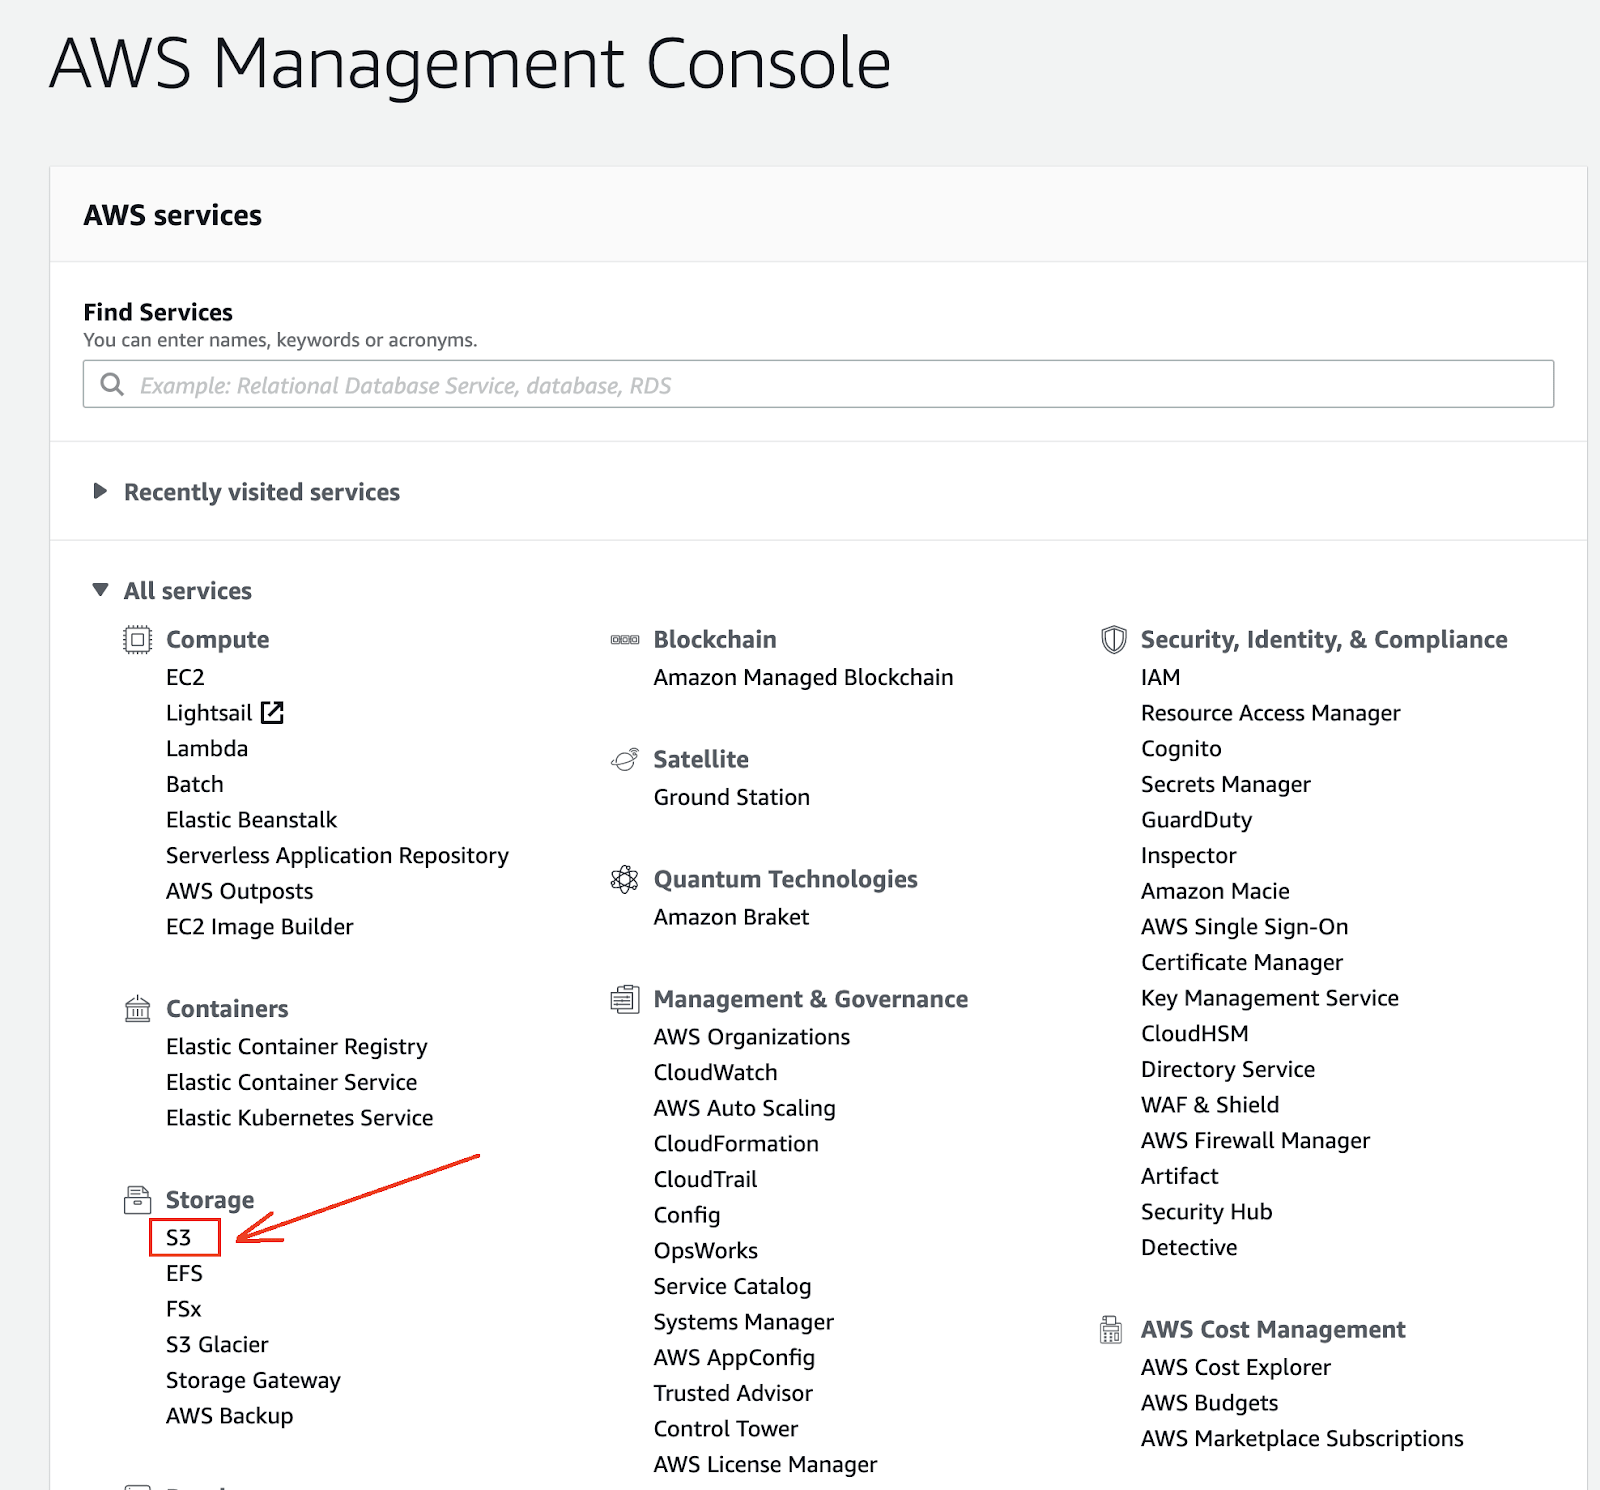
(09-aws-s3.png)
In S3, files are organized in buckets, which are containers for storing data. Inside buckets, you can store files and folders, only as you would exercise on your computer.
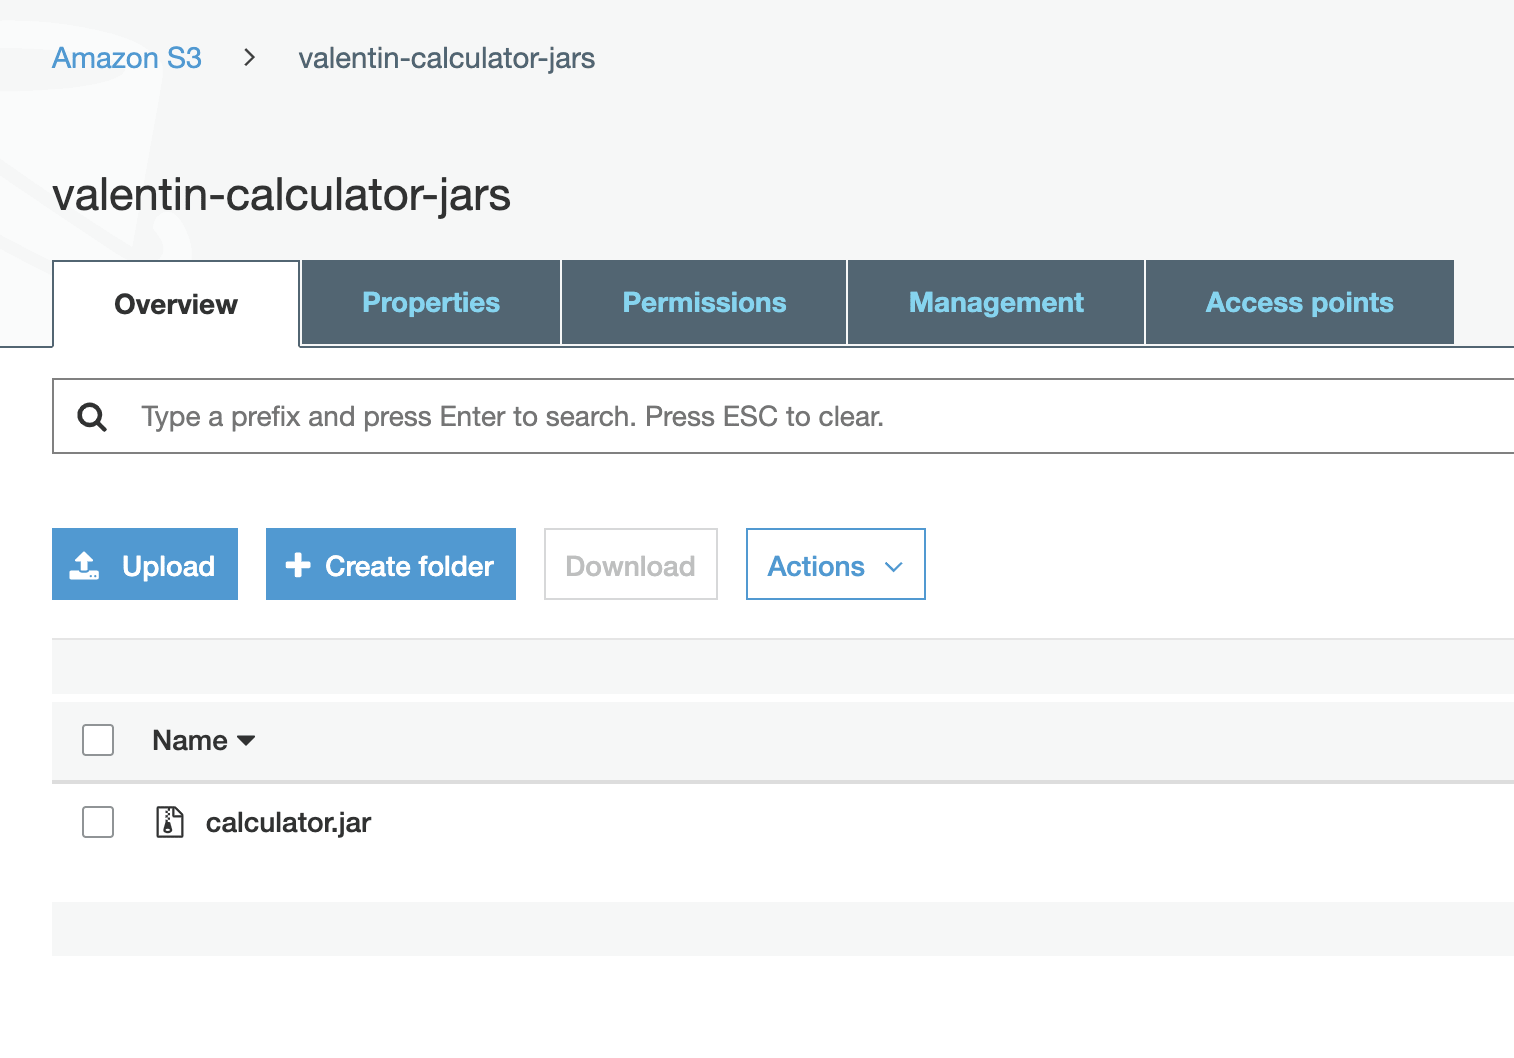
Let'south keep past creating a bucket for storing our jar archives. Your saucepan name needs to be unique, and you may face conflicts if you decide to use common names. I choose to prefix the saucepan with my proper name to avert naming conflicts.
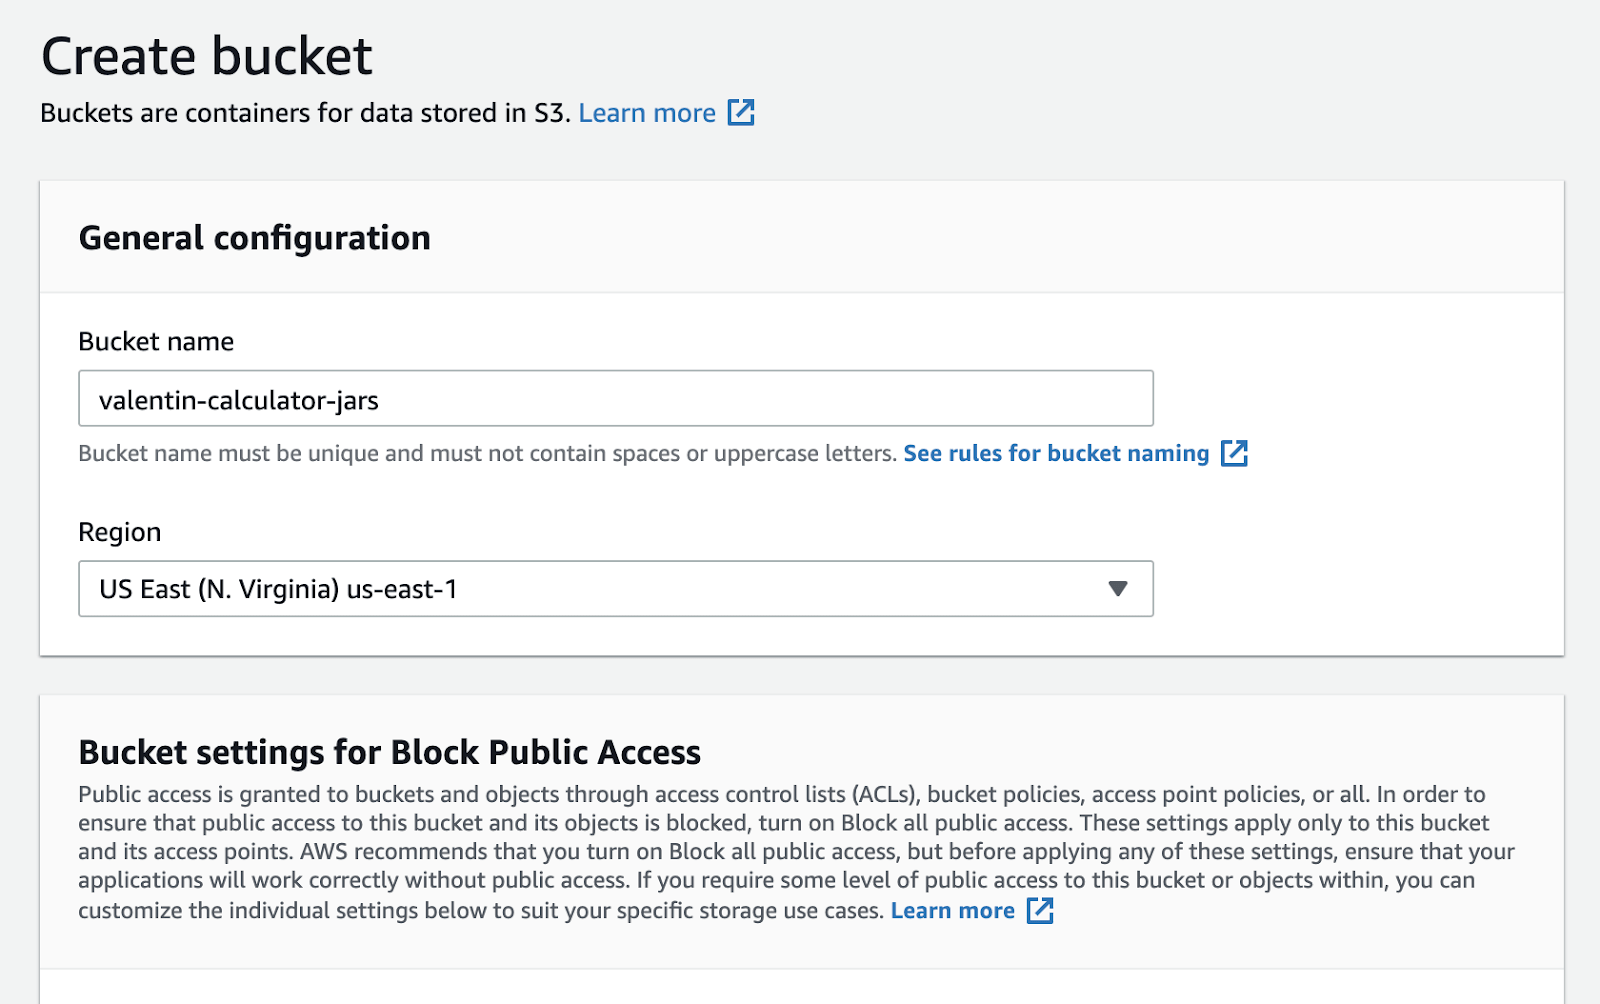
(10-create-s3-bucket.png)
At this point, all you lot need to do is remember the proper noun of the bucket and the region in which the bucket has been created (in the screenshot higher up, the region is usa-east-ane ).
To interact with whatsoever AWS service from the CLI, we cannot use our AWS account'southward username and password. Not only would this be highly risky, but in many cases also impractical. We will create a special user that will simply have access to the services required to perform the tasks needed.
For this reason, from the AWS Direction panel, identify the cake Security, Identity, & Compliance and select the IAM service (Identity and Access Management).
Click on Users > Add user. I will call this user jenkins , so that I can quickly identify information technology. Make certain to enable the Programmatic access to use this user from the AWS CLI.
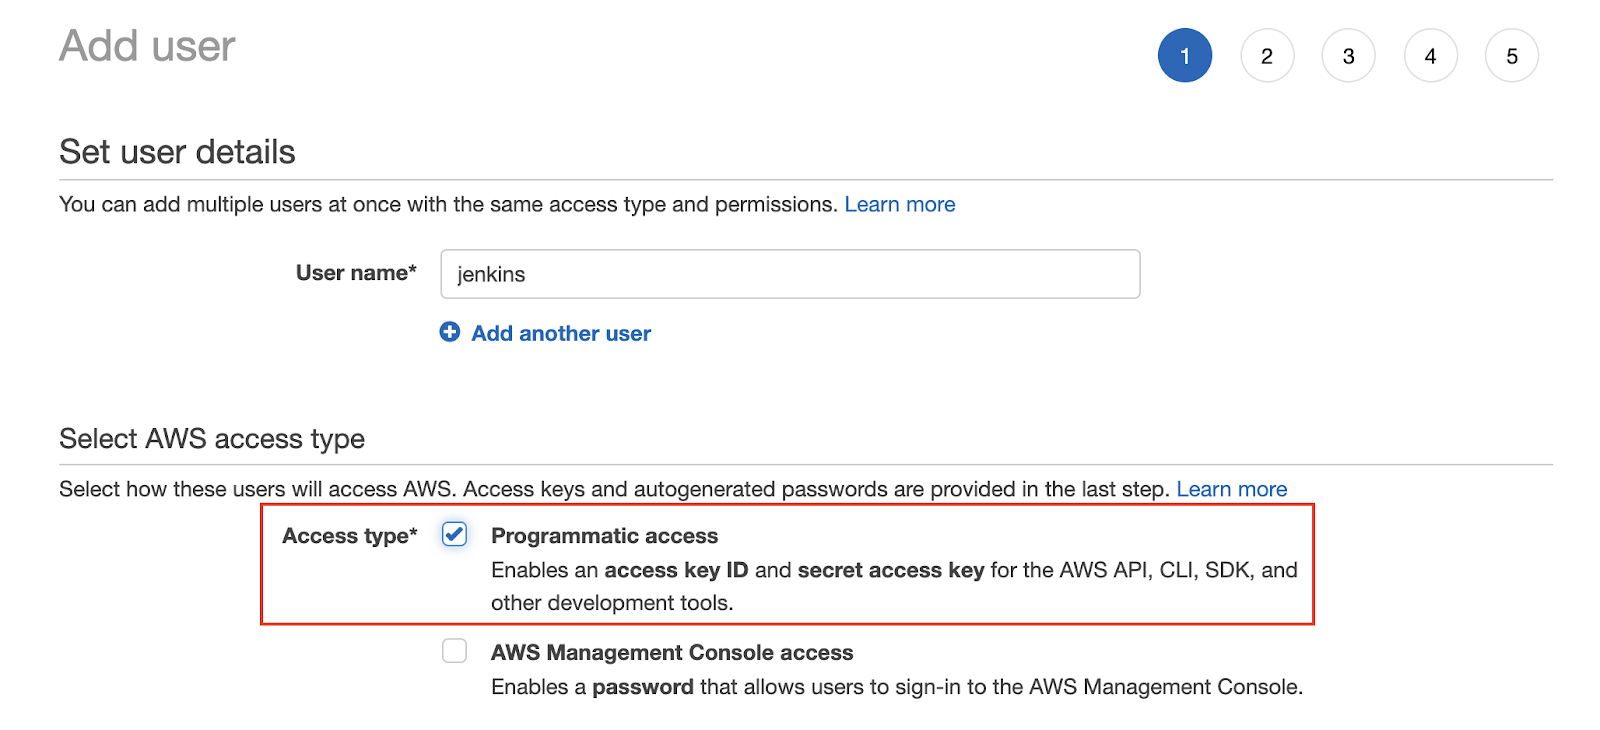
(11-iam-user.png)
The next step will handle the Permissions that the user volition have. We volition use some predefined rules to get started. Select Attach existing policies directly. Using the search field, you tin search for permissions, which frequently include the service name. Make certain that the user has the post-obit permissions: AWSElasticBeanstalkFullAccess , AmazonS3FullAccess .
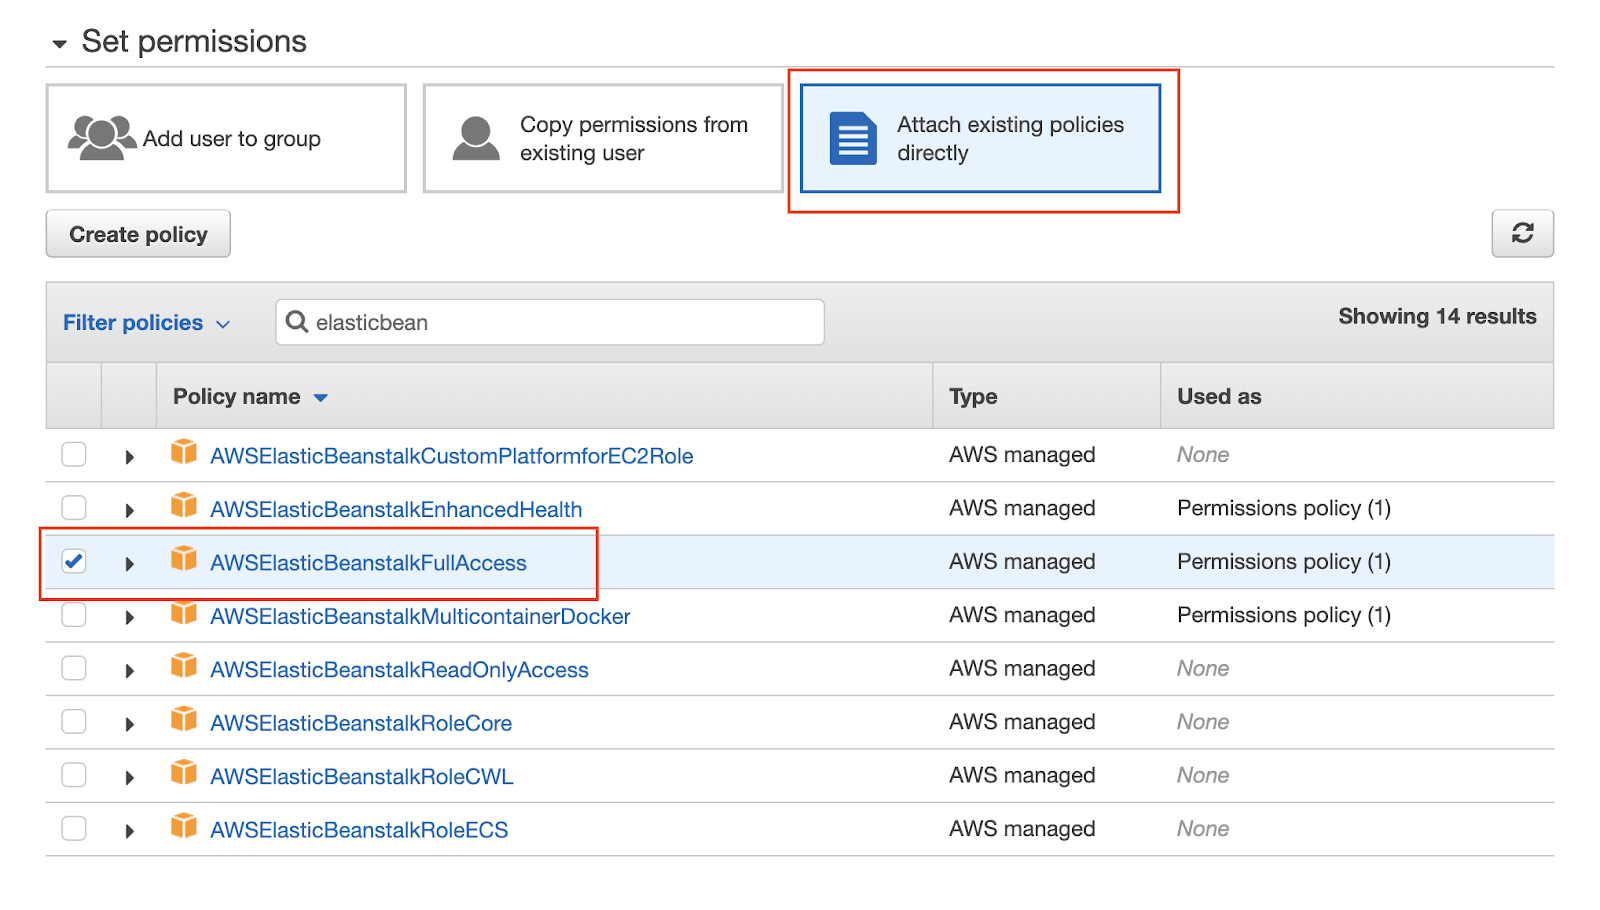
(12-iam-policies.png)
You lot can skip the Tags page, and on the Review page, your configuration should expect very similar to the screenshot below.
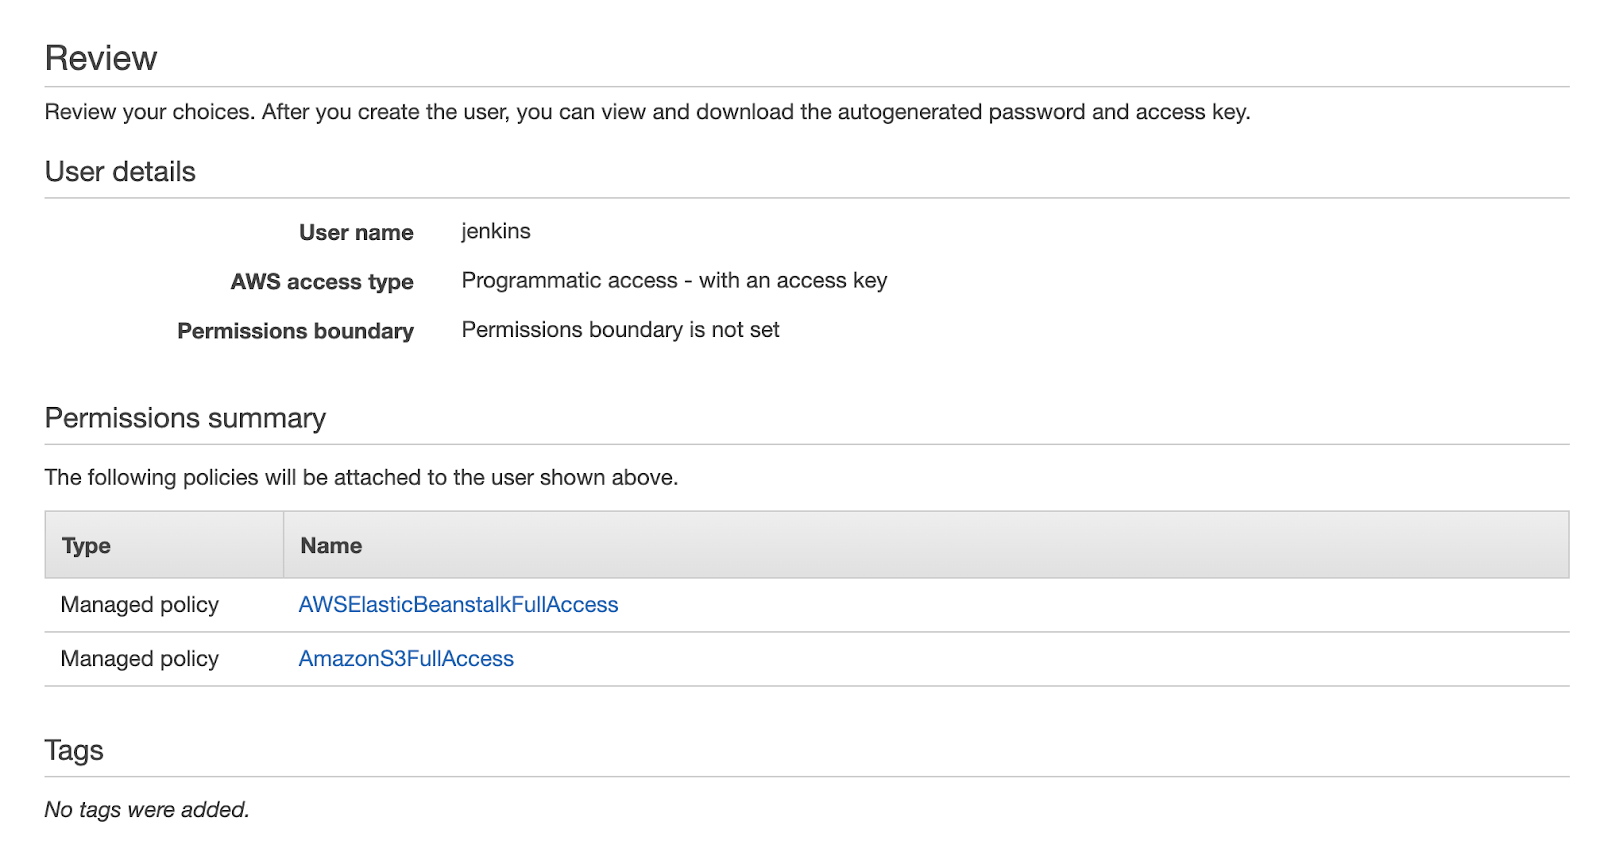
(thirteen-iam-review.png)
If everything looks right, go ahead and create the user. The final page will brandish the credentials that have been generated.
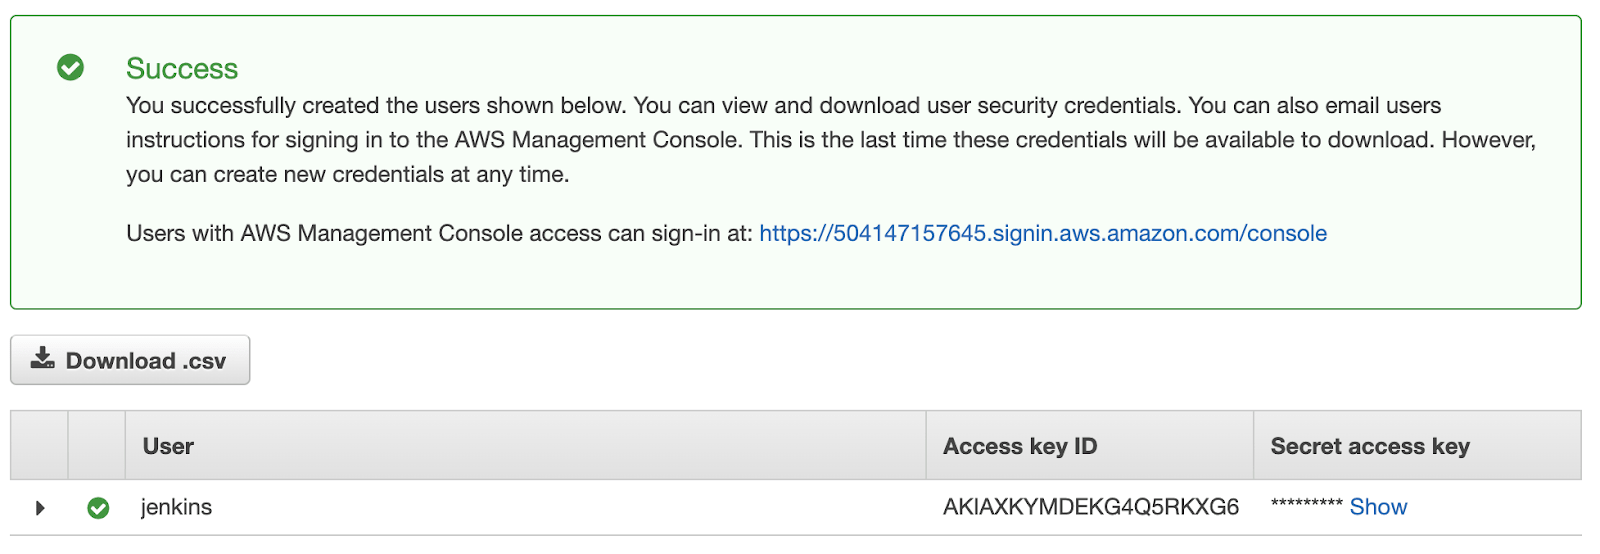
(14-iam-user-credentials.png)
Make sure that y'all store these credentials somewhere rubber or keep this page open for a while. They won't be displayed once more. In case yous lose them, delete the user and echo the same process.
Now information technology is time to leap into Jenkins and shop these credentials and then that we tin can later on use them in our pipeline. Get to Manage Jenkins > Credentials and click on the Jenkins store > Global credentials . If yous meet a card item called Add together Credentials on the right-hand side, y'all have reached the correct place.
Add for both the access key id and the cloak-and-dagger admission key (ii entries in total). I take used the IDs jenkins-aws-secret-key-id and jenkins-aws-undercover-access-key .
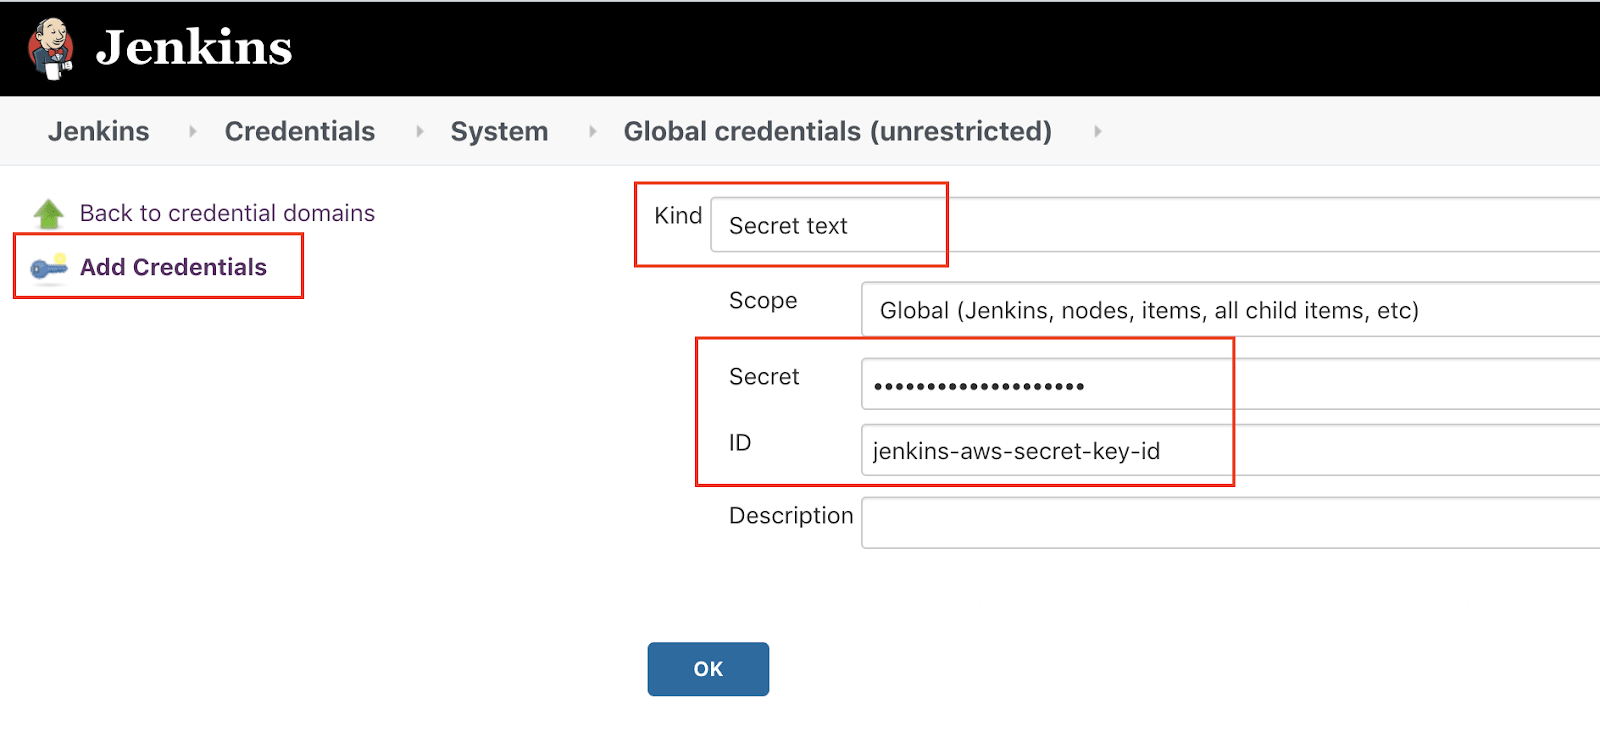
(15-jenkins-credentials-add together.png)
After calculation both credentials, the credentials overview page should expect like to the screenshot below.
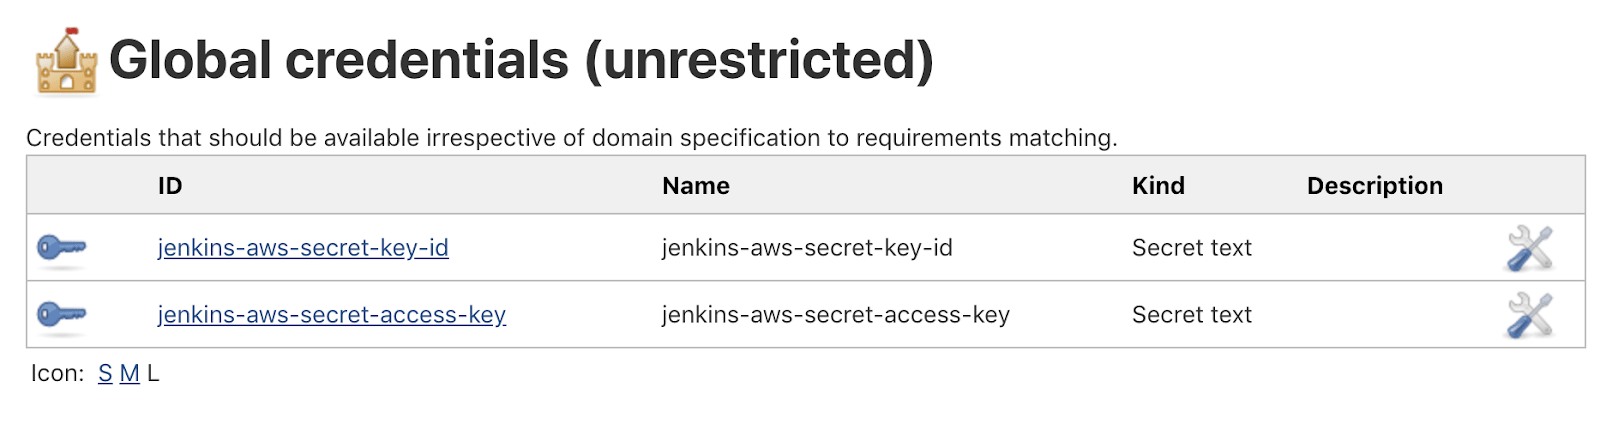
(sixteen-jenkins-credentials-overview.png)
By using this arroyo of storing the credentials inside Jenkins, we ensure that this sensitive data does not land into our Git repository, and the use of the values will non exist displayed in any logs.
The AWS CLI volition automatically option-up the credentials stored in Jenkins, if we expose them as environment variables using a predefined proper noun. The advantage of using environment variables is that many tools will automatically look for predefined names and use them. This makes the commands shorter and easier to read.
Inside the Jenkinsfile within the pipeline cake, add together the post-obit lines:
environment { AWS_ACCESS_KEY_ID = credentials('jenkins-aws-clandestine-key-id') AWS_SECRET_ACCESS_KEY = credentials('jenkins-aws-hush-hush-access-central') } This will instruct Jenkins to create two surround variables ( AWS_ACCESS_KEY_ID , AWS_SECRET_ACCESS_KEY ) and initialize them with the values stored in the Jenkins credential store.
Now we have everything in place to use the AWS CLI for uploading the jar archive to AWS S3.
There are two commands that we will execute.
The start control will let AWS know in which region yous are operating. In my case, I have used the usa-e-1 region for both S3 and EB:
aws configure gear up region u.s.a.-east-1 The second control will practice the upload from Jenkins to S3:
aws s3 cp ./target/calculator-0.0.1-SNAPSHOT.jar s3://YOUR-Bucket-NAME/calculator.jar The copy (cp) command for the S3 service will take two parameters: the source and the destination. During this process, we will rename the jar file.
Nosotros will add both of these commands inside the success cake of the publishing stage. The simplified pipeline later this step will look equally follows:
pipeline { agent any environment { AWS_ACCESS_KEY_ID = credentials('jenkins-aws-underground-key-id') AWS_SECRET_ACCESS_KEY = credentials('jenkins-aws-cloak-and-dagger-access-central') } stages { phase('Build') { // build stage } stage('Test') { // test stage } stage('Publish') { steps { sh './mvnw package' // bat '.\mvnw package' } post { success { archiveArtifacts 'target/*.jar' sh 'aws configure ready region us-east-1' sh 'aws s3 cp ./target/reckoner-0.0.i-SNAPSHOT.jar s3://YOUR-BUCKET-Proper name/estimator.jar' // bat 'aws configure set region us-e-1' // bat 'aws s3 cp ./target/calculator-0.0.1-SNAPSHOT.jar s3://YOUR-BUCKET-Proper name/calculator.jar' } } } } }
Note: If Jenkins is running on Windows, use bat within of sh.
If the pipeline's execution does not indicate any errors, you lot should soon see the jar archive within the newly created S3 saucepan in your AWS business relationship. Please bank check the Troubleshooting section at the end of the article if you lot notice any errors in the console.
(17-s3-upload-washed.png)
How to deploy a new application version to AWS EB from Jenkins
Since nosotros volition start handling many parameters in the post-obit commands, it is fourth dimension to clean-up the pipeline code and organize all variables. Nosotros will begin to define new environs variables that will store the application-specific configuration. Make sure that the post-obit values friction match the values yous have configured in AWS.
environment { AWS_ACCESS_KEY_ID = credentials('jenkins-aws-secret-primal-id') AWS_SECRET_ACCESS_KEY = credentials('jenkins-aws-secret-access-cardinal') ARTIFACT_NAME = 'calculator.jar' AWS_S3_BUCKET = 'YOUR S3 BUCKET Name' AWS_EB_APP_NAME = 'calculator' AWS_EB_ENVIRONMENT = 'Calculator-env' AWS_EB_APP_VERSION = "${BUILD_ID}" }
The start pace in deploying a new version to EB is to create a new application version, by referencing a new jar artifact from S3 and specifying the application proper name and the artifact version.
On an Unix-like system you will access environment variables using the notation $VARIABLE_NAME while on a Windows system the notation volition be %VARIABLE_NAME% .
aws elasticbeanstalk create-application-version --application-name $AWS_EB_APP_NAME --version-characterization $AWS_EB_APP_VERSION --source-parcel S3Bucket=$AWS_S3_BUCKET,S3Key=$ARTIFACT_NAME You tin view the full documentation and the available options at the official AWS CLI documentation for the create-awarding-version control ( https://awscli.amazonaws.com/v2/documentation/api/latest/reference/elasticbeanstalk/create-application-version.html )
Please note that this command will simply create a new awarding version fix for usage in EB, but information technology will not affect the existing running version.
To deploy a new application version, we need to use the update-environment control. This control will simply work if we use a version that has already been created previously. The command options will be similar to the create-application-version command.
aws elasticbeanstalk update-environment --application-name $AWS_EB_APP_NAME --environment-name $AWS_EB_ENVIRONMENT --version-characterization $AWS_EB_APP_VERSION You tin view the total documentation and the available options at the official AWS CLI documentation for the update-environment command. ( https://awscli.amazonaws.com/v2/documentation/api/latest/reference/elasticbeanstalk/update-surround.html )
The complete publish stage will look equally follows:
stage('Publish') { steps { sh './mvnw package' // bat '.\mvnw bundle' } mail service { success { archiveArtifacts 'target/*.jar' sh 'aws configure fix region u.s.a.-due east-i' sh 'aws s3 cp ./target/figurer-0.0.1-SNAPSHOT.jar s3://$AWS_S3_BUCKET/$ARTIFACT_NAME' sh 'aws elasticbeanstalk create-awarding-version --application-proper noun $AWS_EB_APP_NAME --version-label $AWS_EB_APP_VERSION --source-packet S3Bucket=$AWS_S3_BUCKET,S3Key=$ARTIFACT_NAME' sh 'aws elasticbeanstalk update-environment --application-name $AWS_EB_APP_NAME --environment-proper name $AWS_EB_ENVIRONMENT --version-label $AWS_EB_APP_VERSION' } } }
If you await inside the AWS console, yous should be able to notice the latest version available.
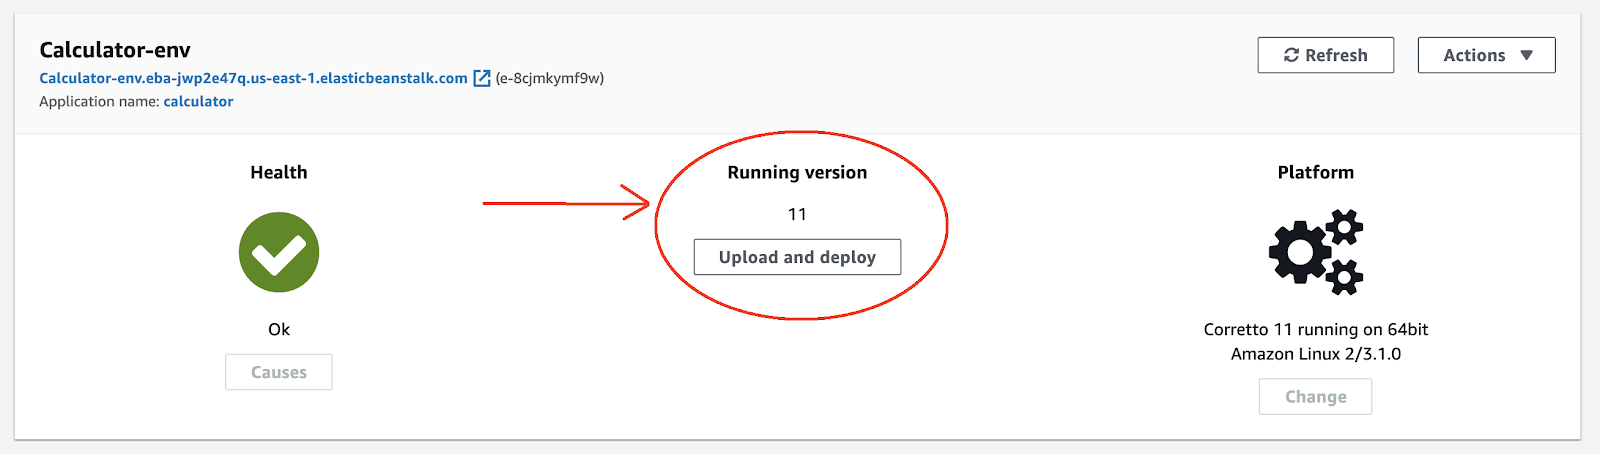
(xviii-ec-new-version.png)
Troubleshooting tips
Deploying to AWS is a circuitous topic, and errors sometimes occur, frequently due to mistakes in the pipeline configuration. Beneath yous will notice some ideas on how to troubleshoot some of the most common errors.
How to observe errors in the Jenkins console logs
Should the pipeline fail at any stage, it is essential to read the logs for hints on what has failed. Yous tin view the logs by clicking on the build number or clicking on the failed phase.
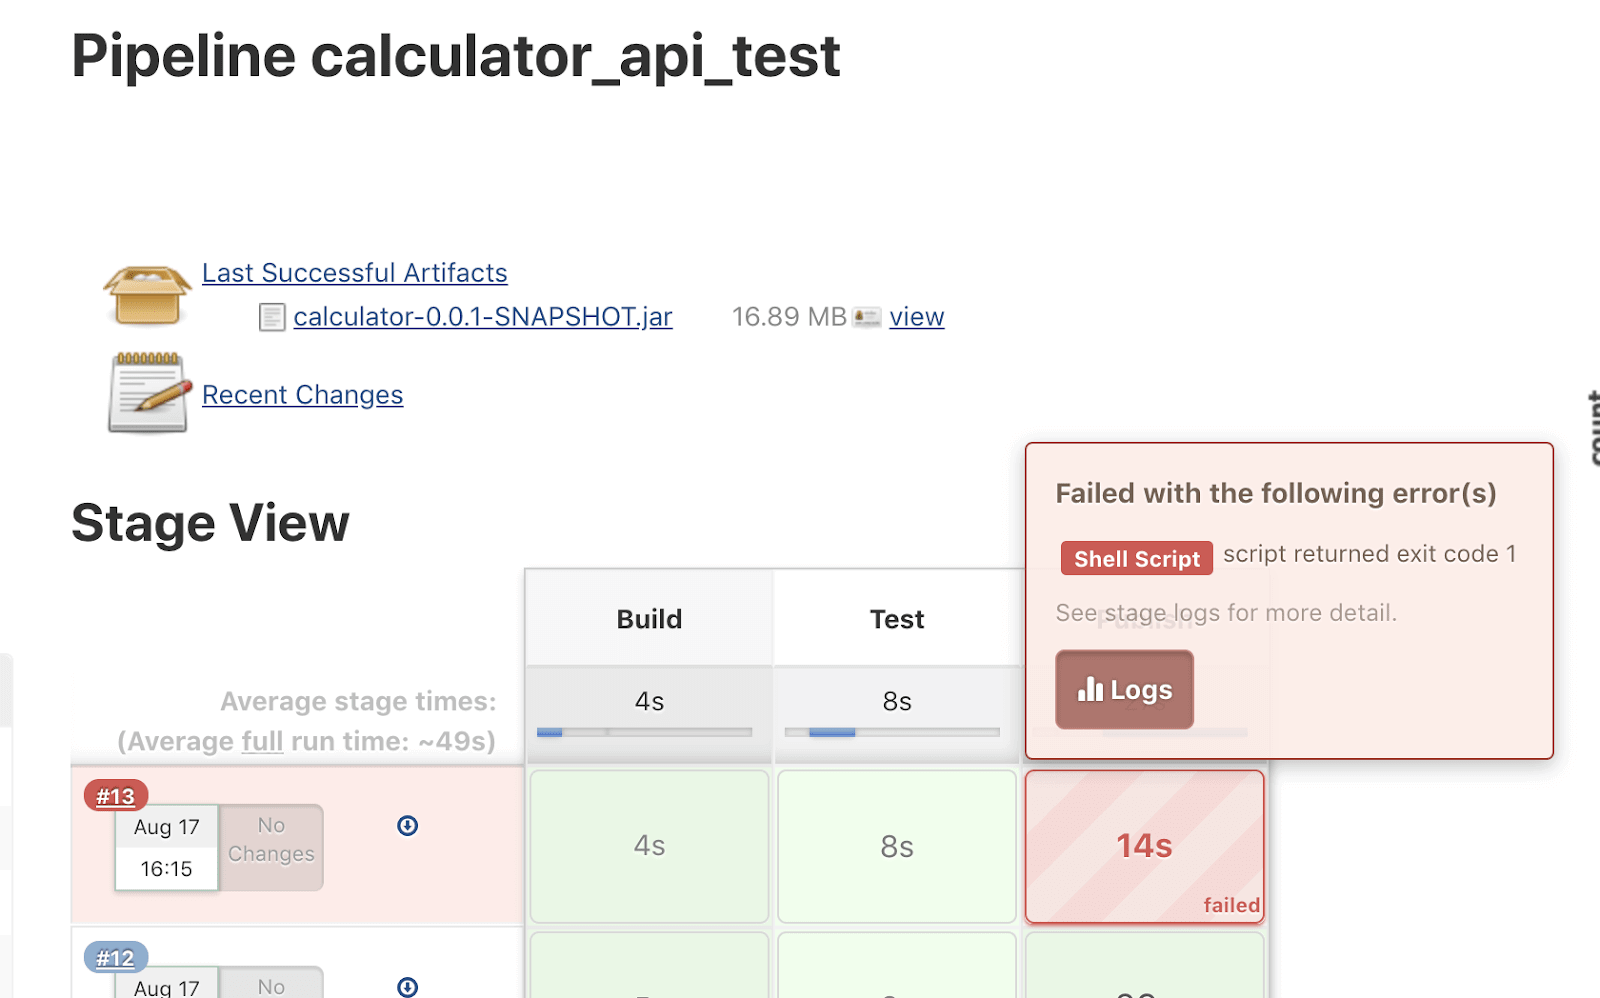
(19-jenkins-error-logs.png)
Try to place the error and the command that has generated the respective mistake.
S3 upload failed – Unable to locate credentials
This error is an indication that the AWS CLI was unable to read the environment variables that contain the credentials needed: AWS_ACCESS_KEY_ID , AWS_SECRET_ACCESS_KEY . Make sure that both variables are defined and correctly spelled.
S3 upload failed – Invalid saucepan proper name "": Bucket name must match the regex
Take a wait at the unabridged aws s3 cp command in the Jenkins logs. You may find that the bucket name is empty. This is typically due to a missing or misspelled environment variable.
An fault occurred (InvalidParameterCombination) when calling the CreateApplicationVersion operation: Both S3 saucepan and key must be specified.
Take a look at the unabridged aws elasticbeanstalk create-awarding-version command in the Jenkins logs. You lot may find that the S3Bucket or S3Key is empty.
The application endpoint responds with 502 Bad Gateway
This is an indication that the application had some issues starting. It is hard to tell the root cause precisely, but the outset identify where you lot can expect for hints is in the application logs. To go them, become to the respective environment and select the carte du jour particular called Logs .
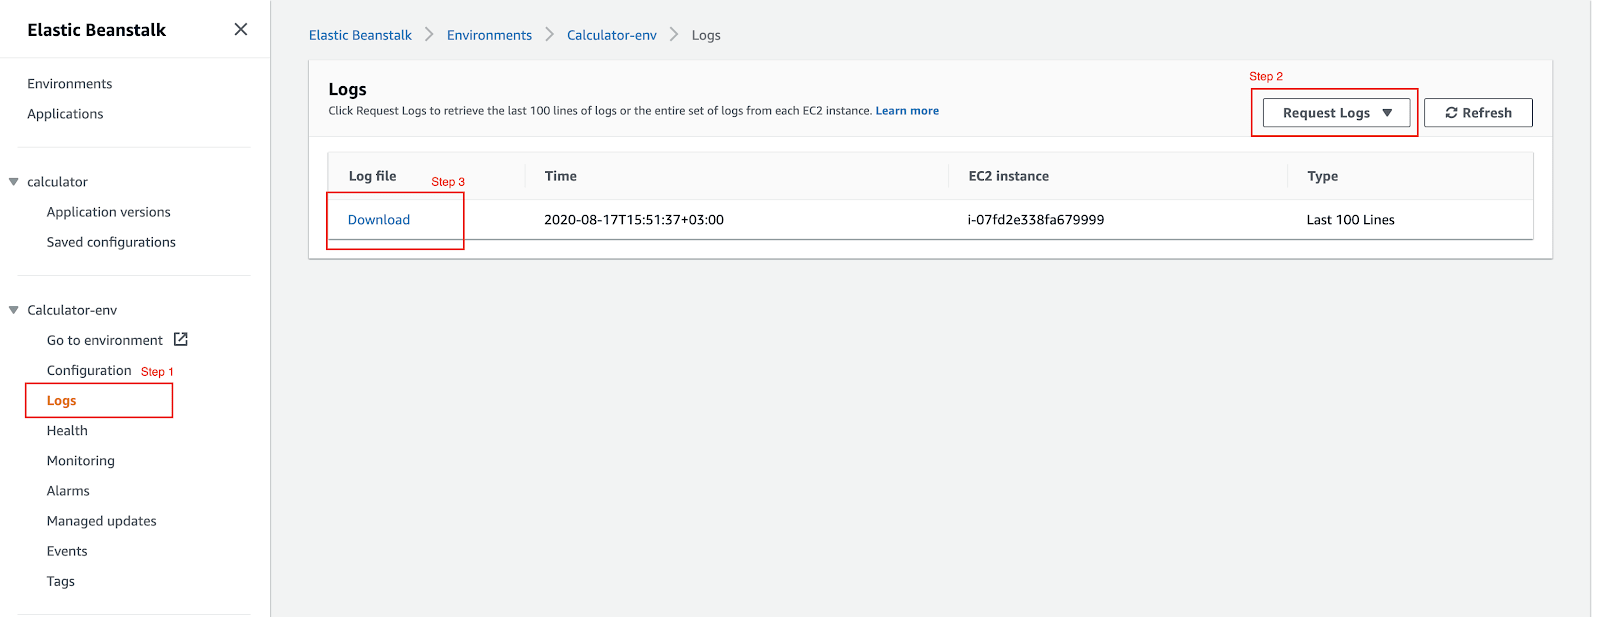
(20-ec-app-logs.png)
From the listing with Asking Logs, get the final 100 entries. In one case the logs are available, click on Download .
'aws' is not recognized as an internal or external control fault in Jenkins
This is an error indicating that the aws command could not exist found by Windows. The kickoff step is to restart the computer and in many cases this will solve the trouble.
Conclusion and next steps
We now have the foundation for a simple but fully working CI/CD pipeline. While we are building, testing, and deploying a Coffee application to AWS, this solution is not product-ready.
The CI pipeline may include additional code review, code quality, test or security stages to ensure the artifact fulfills all requirements before attempting a deployment.
For the CD pipeline, yous may also want to include boosted environments and tests to ensure that a deployment to the production surround volition work without any issues.
martinsholexpeetry.blogspot.com
Source: https://coralogix.com/blog/ci-cd-tutorial-how-to-deploy-an-aws-jenkins-pipeline/
0 Response to "Jenkins Pipeline Code Example to Upload File Into Aws"
Postar um comentário